Nothing is more frustrating than dropping into a match, gathering your favorite loot, and suddenly teleporting straight into an enemy’s crosshairs because of a lag spike. High ping can ruin your competitive experience, but you do not always need to spend money to solve it.
Before you rush to buy expensive gear, try these software and system tweaks to stabilize your connection.
⚠️ Affiliate Disclosure: TechPlayGrid is reader-supported. When you buy through links on our site, we may earn an affiliate commission at no extra cost to you.
Quick Fortnite Settings to Lower Ping
Photo credit: Fortnite website. For illustrative purposes only.
Your first stop should always be the in-game settings. Sometimes, the game itself is routing you inefficiently.
Choose the Right Matchmaking Region
Fortnite usually sets your server region to “Auto,” which is supposed to connect you to the closest server. However, during off-peak hours, it might route you to a server further away to find a match faster.
Open the Settings menu in Fortnite.
Go to the Game tab (the gear icon).
Under Language & Region, manually select the server with the lowest “ms” number.
Close Bandwidth-Heavy Background Apps
Your game might be competing for bandwidth with other applications on your PC. Web browsers with dozens of tabs, game launchers downloading updates in the background, and voice chat software can cause major lag.
Pro Tip: If you use Discord to communicate with your squad and notice performance drops, make sure to read our complete guide on how to fix Discord lag while gaming to keep your system running smoothly.
Optimize Your Current Connection
You can make your existing internet setup more efficient without touching a single cable.
Flush Your DNS
Clearing your PC’s network cache can force a fresh, faster route to the Epic Games servers.
Type cmd in your Windows search bar, right-click, and select Run as administrator.
Type ipconfig /flushdns and press Enter.
Switch to a Public DNS
Sometimes, your internet provider’s default DNS is slow. Switching to Google’s public DNS can reduce your ping slightly. Go to your Windows Network Settings, find your adapter properties, and change the IPv4 DNS servers to 8.8.8.8 and 8.8.4.4.
When You Actually Need Hardware Upgrades
If you have tried the steps above and your ping is still holding you back, your local hardware might be the bottleneck. Here is what to look for on Amazon US if you decide to upgrade.
Get the Best Ethernet Cable Under $15
The absolute best fix for high ping is getting off Wi-Fi. A wired connection is immune to wireless interference. You do not need anything expensive. The Amazon Basics RJ45 Cat-6 Ethernet Cable or the UGREEN Cat 6 Ethernet Cable are both highly rated, consistently in stock on Amazon US, and will deliver zero packet loss for under $15.
Consider a Budget Gaming Router
Photo credit: Fortnite website. For illustrative purposes only.
If you absolutely must use Wi-Fi (for example, if your console or PC is too far from the modem), and your router is more than 5 years old, an upgrade might be necessary. Look for routers with Wi-Fi 6 technology. The TP-Link Archer AX21 (AX1800) is a proven best-seller on Amazon US that offers excellent traffic prioritization for gaming without breaking the bank.
While a stable connection fixes your network delay, having a smooth visual experience is just as important. Check out our recommendations for the best 144Hz monitors under budget to ensure you see every frame clearly.
You launch Discord screen share to watch a game with friends. Instantly: your keyboard feels sluggish, your audio cuts out mid-sentence, or your friends see a stuttering, frozen image of your screen while you’re playing fine on your end.
This is Discord screen share input lag — and it’s a different beast from the regular Discord lag you might have fixed before. If you already followed our Discord lag fix for Valorant, you know the drill: free fixes first, hardware only if nothing else works. This guide follows the same structure but targets the specific causes that only appear when screen sharing is active.
⚠️ Affiliate Disclosure: TechPlayGrid is reader-supported. When you buy through links on our site, we may earn an affiliate commission at no extra cost to you.
🔍 Why Screen Sharing Causes Its Own Input Lag
Regular Discord voice chat is lightweight. Screen sharing is not. When you share your screen, Discord must encode or decode video, capture your screen, render an overlay, and use GPU acceleration in the background — all simultaneously. On a system already close to full load, that extra workload is enough to cause stutter, input delay, or sudden frame dips.
The result is a problem with three distinct symptoms, each with different causes:
Symptom
What It Looks Like
Root Cause
Keyboard input lag
Keys register late in-game while sharing
CPU/GPU bottleneck from dual encoding
Audio delay/cutout
Voice lags or cuts when sharing starts
Discord audio subsystem conflict
Friends see frozen/choppy stream
Your screen looks fine, theirs doesn’t
Encoder settings or bandwidth issue
💡 Pro Tip: The most important diagnostic step: does the lag start the moment you enable screen share, or does it appear gradually? If it’s immediate, it’s a settings conflict. If it builds over time, it’s a thermal or memory issue.
✅ Fix 1 — Toggle Hardware Acceleration (The #1 Cause)
Hardware acceleration shifts demanding tasks like encoding for video calls and high-resolution image scaling to your GPU. When your GPU is already hitting maximum utilization during gaming, Discord may struggle to find the cycles it needs to render its own interface — causing input lag, audio drops, and choppy streams.
The confusing part: for some systems, turning it off fixes the problem. For others, turning it on fixes it. You have to test both.
If Hardware Acceleration is currently ON → Turn it OFF:
Open Discord → Settings (gear icon) → Advanced
Toggle Hardware Acceleration → OFF
Click “Okay” when Discord asks to restart
Relaunch Discord and test screen share
If it’s currently OFF → Turn it ON and test.
💡 Pro Tip: This single setting causes more confusion than any other in Discord because the best choice depends entirely on your specific hardware and what you’re doing. There’s no universal answer — test both and keep whichever works.
✅ Fix 2 — Disable Hardware-Accelerated GPU Scheduling (HAGS) in Windows
This is the fix most guides miss — and it’s been the most impactful for screen share input lag since 2024. Microsoft has acknowledged that Windows 11 version 24H2 introduced compatibility issues with Hardware-Accelerated GPU Scheduling (HAGS), causing conflicts with streaming applications like Discord. Additionally, some users may experience NVENC encoder failures after updates, which directly impacts screen sharing capabilities.
How to disable HAGS:
Press Windows + I → System → Display
Scroll down to Graphics → Click Change default graphics settings
Toggle Hardware-accelerated GPU scheduling → OFF
Restart your PC completely
Test screen sharing again after the reboot. This fix resolves keyboard input lag during screen share for a significant portion of affected users.
✅ Fix 3 — Switch the Screen Share Encoder (H.264 vs. H.265 vs. Software)
Time: 3 minutes | Difficulty: Easy | Impact: ⭐⭐⭐⭐
Disabling hardware-accelerated encoding can prevent overlay lag that frequently disrupts gameplay. To implement a permanent screen share lag fix, navigate to Voice & Video settings and adjust the H.264 Video Codec options.
Steps:
Discord → Settings → Voice & Video
Scroll to Video Codec
Try toggling H.264 Hardware Acceleration — if ON, turn OFF (or vice versa)
Also try switching between H.264 and H.265 if available
Why this matters specifically for screen share:
When screen sharing a game, Discord uses your GPU’s video encoder (NVENC for NVIDIA, AMF for AMD). If the driver has bugs, poor support for a newer game, or issues with hardware video encoding, you may see stuttering, sudden frame drops, black screens, or desync between audio and video. Switching to software encoding removes the GPU from the equation — more CPU usage, but more stability.
Lowering your broadcast to 720p at 30 FPS reduces the demand on your video encoder, providing a smoother experience for both you and your viewers.
Streaming your screen at 1080p 60fps to friends requires significant encoding overhead. Unless you have a dedicated streaming PC, this competes directly with your game for CPU and GPU resources.
How to set resolution before sharing:
Click the Screen Share button in Discord (monitor icon)
Before confirming, click Stream Quality settings
Set Resolution → 720p
Set Frame Rate → 30 FPS (or 15 FPS for very low-end systems)
💡 Pro Tip: For watching together with friends, 720p 30fps is completely watchable. The difference between 1080p 60fps and 720p 30fps is only noticeable in fast-moving action — and the input lag elimination is immediately perceptible.
✅ Fix 5 — Disable the Discord In-Game Overlay
Time: 2 minutes | Difficulty: Easy | Impact: ⭐⭐⭐⭐
The overlay draws a transparent layer over your game, hooks into the game’s rendering pipeline, and can cause input lag. Multiple overlays running simultaneously multiply the GPU and CPU overhead — Discord’s overlay conflicting with other overlays is a common hidden cause of input delay.
Disable Discord overlay completely:
Discord → Settings → Game Overlay
Toggle Enable in-game overlay → OFF
Also disable it per-game: under Games tab → find your game → toggle overlay off
Also disable competing overlays:
GeForce Experience: Settings → General → Toggle “In-Game Overlay” → OFF
Xbox Game Bar: Windows Settings → Gaming → Xbox Game Bar → OFF
Games running fullscreen can block Discord from capturing them properly. Running Discord as administrator gives it the permissions needed to capture fullscreen applications correctly. Without admin rights, Discord’s capture can fail silently — causing black screens, extra encoding attempts, and associated lag.
Close Discord completely (right-click taskbar icon → Quit Discord)
Find the Discord shortcut (Desktop or Start Menu)
Right-click → Properties → Compatibility tab
Check Run this program as an administrator
Click Apply → OK → Relaunch Discord
✅ Fix 8 — Clear Discord Cache
Time: 3 minutes | Difficulty: Easy | Impact: ⭐⭐⭐
Corrupted cache files can cause erratic performance during screen share, especially after Discord updates.
Close Discord completely
Press Windows + R → type %appdata%\discord
Delete the Cache and Code Cache folders
Relaunch Discord
✅ Fix 9 — Update GPU Drivers (Clean Install)
Time: 10 minutes | Difficulty: Medium | Impact: ⭐⭐⭐⭐
Disabling Xbox Game Bar and background recording removes a layer of GPU capture overhead that compounds with Discord’s own screen share or overlay features. When sharing your screen, Discord may rely on your GPU to capture, encode, and render video. If the driver has bugs or has issues with hardware video encoding, you may see stuttering, sudden frame drops, black screens, or desync between audio and video.
For NVIDIA:
Download latest Game Ready Driver from nvidia.com
Run installer → Custom → Check Perform a clean installation
For AMD:
Download AMD Adrenalin Edition from amd.com
Run installer → Select Factory Reset option
📊 Fix Priority Cheat Sheet
Fix
Symptom It Solves
Time
Impact
Toggle Hardware Acceleration
All three symptoms
2 min
⭐⭐⭐⭐⭐
Disable HAGS in Windows
Keyboard lag, encoder failures
3 min
⭐⭐⭐⭐⭐
Switch encoder (H.264 toggle)
Choppy stream, desync
3 min
⭐⭐⭐⭐
Lower resolution to 720p 30fps
All three symptoms
2 min
⭐⭐⭐⭐
Disable all overlays
Keyboard lag, FPS drops
2 min
⭐⭐⭐⭐
Audio subsystem → Legacy
Audio lag/cutout only
1 min
⭐⭐⭐⭐
Run Discord as Administrator
Black screen, capture lag
1 min
⭐⭐⭐
Clear Discord cache
Erratic behavior after updates
3 min
⭐⭐⭐
Clean GPU driver install
All three symptoms
10 min
⭐⭐⭐⭐
💻 Still Lagging? Hardware Upgrades That Actually Help
If you’ve applied all fixes above and screen sharing still causes input lag, your hardware is the ceiling.
Option A — Add More RAM
Screen share + game + Discord’s Electron framework together can push 16GB RAM to its limit. If Task Manager shows RAM usage above 85% during screen sharing, an upgrade will help.
If your friends see lag but you don’t, the issue is your upload bandwidth stability. <cite index=”38-1″>RTC Connecting issues and stream lag for viewers are often caused by Wi-Fi instability rather than hardware — a wired connection eliminates packet loss entirely.</cite>
Option C — Upgrade Your Headset (for Audio Lag Specifically)
If audio-only lag persists after all fixes, a USB headset with its own onboard DAC bypasses Windows audio routing entirely — eliminating software-layer audio delay.
Yes — directly. <cite index=”26-1″>Discord streaming adds extra CPU, GPU, memory, and disk activity on top of the game you are sharing. If your system is already close to full load, the stream can push it over the edge and cause FPS drops, stuttering, delayed audio, or input lag.</cite> Fix 1 (Hardware Acceleration) and Fix 5 (overlay) have the most impact on FPS specifically.
Why does my keyboard lag only during screen share, not during normal gaming?
The screen capture and encoding pipeline runs on the same CPU threads that handle input polling. <cite index=”36-1″>The overlay is the most common cause of input delay when gaming with Discord — it draws a transparent layer over your game and hooks into the game’s rendering pipeline.</cite> Disabling the overlay (Fix 5) and HAGS (Fix 2) typically resolves keyboard-specific lag.
Why do my friends see lag but I don’t feel any?
This is an upload/encoding issue, not a local performance issue. Your PC is encoding the stream correctly from your perspective but struggling to maintain consistent upload bitrate for your friends. Fix 3 (lower stream resolution) and Fix 9 (GPU driver) address this specifically.
Is Discord Nitro required for higher-quality screen sharing?
Yes — Discord Nitro unlocks 1080p 60fps screen share. Free accounts are limited to 720p 30fps. However, for gaming watch parties, 720p 30fps is typically sufficient, and the lower quality actually reduces the encoding load that causes input lag.
Should I use Discord’s screen share or stream through OBS instead?
For serious streaming, OBS with the “Share to Discord” integration is significantly more efficient — OBS uses hardware encoding properly, unlike Discord’s capture pipeline. For casual friend groups, fixing Discord settings is simpler and adequate.
Last updated: July 2026 | Verified for Discord Stable + PTB versions
⚠️ Affiliate Disclosure: TechPlayGrid participates in the Amazon Associates Program and other affiliate programs. We earn a commission on qualifying purchases at no extra cost to you.
🏷️ SEO Metadata
Title: Fix Discord Input Lag for No Lag While Screen Sharing
Meta Description: Discord causing keyboard lag or audio delay when screen sharing? These 9 free fixes target the specific causes — no upgrade needed. Step-by-step guide for 2026.
Tags: discord input lag screen sharing, discord screen share lag fix, discord keyboard lag fix, discord audio delay screen share, discord screen share fix 2026, discord lag while streaming, fix discord overlay lag
Post Summary: Discord screen share input lag is a distinct problem from regular Discord lag — and it needs its own fixes. This guide covers 9 free solutions in order of impact: toggling Hardware Acceleration, disabling Windows HAGS (the most overlooked fix for 2024–2026), switching the H.264 encoder, lowering stream resolution to 720p, disabling all overlays, switching the audio subsystem to Legacy, running Discord as administrator, clearing cache, and doing a clean GPU driver install. Hardware upgrade options are included for cases where software fixes aren’t enough.
Valorant was built to run on almost anything. Riot’s stated goal was 30 FPS on a machine from 2014 using integrated graphics — and they hit it. But “running” and “competitive” are two completely different things.
If you’re dropping below 60 FPS on a laptop or older desktop, you’re losing spray control, increasing input lag, and giving up reaction advantage to every opponent on a modern rig. The good news: you don’t need expensive upgrades. These proven tweaks helped players jump from a painful 40 FPS to a buttery-smooth 120 FPS in Valorant in 2026. No gimmicks. Just smart settings that actually work.
This guide creates a cluster with our Discord lag fix for Valorant — if you followed that guide already, start here for the graphics side of optimization.
⚠️ Affiliate Disclosure: TechPlayGrid is reader-supported. When you buy through links on our site, we may earn an affiliate commission at no extra cost to you.
🔍 What “Low-End PC” Means for This Guide
This guide is written for:
Hardware Profile
Description
Integrated graphics
Intel HD/UHD, AMD Vega (no dedicated GPU)
Entry GPU
GTX 1050, GTX 1050 Ti, GTX 1060, RX 570, RX 580
Mid-range aging GPU
GTX 1660, RTX 2060 (struggling to hit 144 FPS)
Low RAM
8GB or less
HDD storage
Traditional hard drive (not SSD)
If you have an RTX 3060 or RX 6600 and newer, follow our Fortnite FPS optimization guide — different game, same Windows tweaks apply.
🎮 Step 1 — In-Game Video Settings (Biggest Impact, Free)
Open Valorant → Settings → Video → General
Resolution — The Single Largest FPS Gain
Resolution is the priority: reducing pixel count first gives the single biggest gain on integrated graphics. 1280×720 alone takes most integrated setups from under 30 FPS to 45–60 FPS.
Your Situation
Recommended Resolution
Dedicated GPU, struggling to hit 60 FPS
1280 × 720 (16:9)
Integrated graphics
1280 × 720 or 1024 × 768 (4:3)
Already hitting 60+ FPS, want more
Stay at 1920 × 1080, optimize other settings
Display Mode: Always Fullscreen Windowed and Borderless Window modes use more CPU for compositing. Fullscreen gives Valorant direct GPU access.
Limit FPS — Set Per-State Caps:
State
Recommended Cap
Why
In menus
60 FPS
Saves GPU heat for matches
Background
30 FPS
Frees resources when tabbed out
In match
Uncapped or match your Hz
Let the GPU do its job
Always
Leave uncapped
Consistent pressure = consistent frames
Full Graphics Settings Table
Go to Settings → Video → Graphics Quality and apply these:
Setting
Recommended Value
FPS Impact
Multithreaded Rendering
ON (if 4+ CPU cores)
⭐⭐⭐⭐⭐ — Critical
Material Quality
Low
⭐⭐⭐
Texture Quality
Low
⭐⭐
Detail Quality
Low
⭐⭐
UI Quality
Low
⭐
Vignette
Off
⭐
V-Sync
OFF
⭐⭐⭐⭐ — Always off
Anti-Aliasing
None
⭐⭐⭐
Anisotropic Filtering
1x
⭐⭐
Improve Clarity
Off
⭐
Bloom
Off
⭐⭐
Distortion
Off
⭐⭐
Cast Shadows
Off
⭐⭐⭐⭐
💡 Pro Tip: Turning off Cast Shadows is a massive win. Shadows are among the most GPU-intensive effects in Valorant, and disabling them can boost your FPS by 15–25 frames depending on your system. And turning off Bloom and Distortion? These are purely cosmetic effects. They don’t help you spot enemies, they don’t improve gameplay, and they consume GPU resources. Turn them off without hesitation.
🖥️ Step 2 — NVIDIA and AMD Specific Settings (Free)
For NVIDIA GPU Users
Open NVIDIA Control Panel → Manage 3D Settings → Program Settings → Add Valorant
Setting
Value
Power Management Mode
Prefer Maximum Performance
Low Latency Mode
Ultra
Texture Filtering – Quality
High Performance
Threaded Optimization
On
Vertical Sync
Off
NVIDIA Reflex (in-game)
On + Boost
💡 Pro Tip: If you have an Nvidia card (GTX 900 series or newer), set NVIDIA Reflex to On + Boost. It keeps your GPU clock speeds high even when the game isn’t demanding much load, which significantly lowers input latency.
For AMD GPU Users
Open AMD Adrenalin → Gaming → Valorant (or Global Settings)
Setting
Value
Radeon Anti-Lag
Enabled
Radeon Image Sharpening
Off (performance mode)
Wait for Vertical Refresh
Off
Texture Filtering Quality
Performance
⚙️ Step 3 — Windows Tweaks (Free, 10 Minutes)
Set Power Plan to High Performance
Press Windows + R → type powercfg.cpl → Enter
Select High Performance (or Ultimate Performance if available)
If not visible, click “Show additional plans”
⚠️ Note: If you’re on a laptop, use High Performance only when plugged in. On battery, it drains charge very fast.
Disable Windows Game Mode (Counterintuitive But Effective)
As covered in our Fortnite FPS guide, Windows Game Mode can actually cause stutters by aggressively reallocating resources mid-game.
Outdated drivers are silent FPS killers. Both NVIDIA and AMD release regular driver updates that include game-specific optimizations for titles like Valorant. NVIDIA users: Download the latest Game Ready drivers from NVIDIA’s official driver page. Use the “Clean Installation” option to remove old driver remnants.
For AMD: Download the latest Adrenalin Edition from amd.com/en/support.
📊 Combined Settings Quick Reference
Category
Key Action
FPS Gain
Resolution
Drop to 1280×720
+30–60% on integrated/entry GPU
Multithreaded Rendering
ON
+15–25% on multi-core CPUs
V-Sync
OFF
Eliminates input lag cap
Cast Shadows
OFF
+15–25 FPS
NVIDIA Reflex
On + Boost
Reduces input latency
Power Plan
High Performance
+5–15% consistency
GPU drivers
Update + clean install
+5–20% depending on update
Windows Game Mode
OFF
Eliminates stutters
💻 Still Under 60 FPS? These Upgrades Actually Help
For illustrative purposes only. Valorant
If you’ve applied every setting above and still can’t reach playable competitive FPS, your hardware is the ceiling.
Upgrade 1 — Add More RAM (Most Impactful Under $50)
FPS and Ping are different. FPS is your computer’s speed. If you have high ping, use an Ethernet cable instead of Wi-Fi and close bandwidth-heavy apps. If you’re below 8GB RAM, upgrading is the single most impactful hardware change under $50.
What is the minimum spec to play Valorant competitively in 2026? Valorant was built from the ground up to run on hardware your parents might have thrown out. Riot’s stated design goal was 30 FPS on a machine from 2014 using integrated graphics. For competitive play, however, you need a stable 60+ FPS — ideally 144+. An Intel Core i5 with 16GB RAM and a GTX 1060 or equivalent can hit 144 FPS with the settings in this guide.
Does Multithreaded Rendering really make that much difference? Yes — especially on older quad-core CPUs. Multithreaded Rendering: Turn this ON if you have 4+ cores. It’s crucial. It distributes rendering work across all cores instead of hammering a single one.
Will lowering resolution make enemies harder to see? At 720p on a small monitor (24″ or less), enemies are still clearly visible — Valorant’s character design uses high-contrast colors specifically to remain legible at low resolutions. The trade-off in frame rate is almost always worth it for competitive play.
Is it worth playing Valorant on integrated graphics? Yes, with the settings in this guide. 1280×720 alone takes most integrated setups from under 30 FPS to 45–60 FPS. On Intel UHD 630 or AMD Vega 8, you can realistically hit 60 FPS and play competitively with tweaks.
Does turning off V-Sync cause screen tearing? Yes, it can cause visible horizontal tearing. If this bothers you, use an FPS cap via the in-game limiter instead (set to your monitor’s refresh rate minus 3 FPS). V-Sync causes massive input lag and caps your frames below your monitor’s potential. The trade-off is almost never worth it in a competitive shooter.
Last updated: July 2026 | Verified for Valorant Episode 10 / 2026 Act
⚠️ Affiliate Disclosure: TechPlayGrid participates in the Amazon Associates Program and other affiliate programs. We earn a commission on qualifying purchases at no extra cost to you.
🏷️ SEO Metadata
Title: Best Valorant Settings for Low-End PC — New FPS Boost Guide
Meta Description : Struggling under 60 FPS in Valorant? These new in-game settings, Windows tweaks, and GPU configs can double your frames on any low-end PC. Free guide for 2026.
Tags: best valorant settings low end pc 2026, valorant fps boost low end, valorant settings for weak pc, how to get more fps valorant, valorant 60fps low end, valorant settings guide 2026, valorant performance boost no upgrade
Post Summary: Valorant is designed to run on old hardware — but “running” and “competitive” are two very different things. This guide covers every free setting that matters in 2026: switching to the optimal resolution, enabling Multithreaded Rendering, disabling Cast Shadows and V-Sync, configuring NVIDIA Reflex or AMD Anti-Lag, and applying key Windows tweaks like Power Plan and disabling Game Mode. Hardware upgrade options (RAM, SSD, Ethernet) are included at the end for players who’ve hit their software ceiling.
Você está no 1v1 final, o gás fechando, mira travada no inimigo — e a tela congela. Quando volta, você já está no lobby. Ninguém merece.
A boa notícia: é possível otimizar o Free Fire em celulares Android sem recorrer a aplicativos de terceiros, que podem comprometer sua conta. A maioria dos casos de travamento tem solução gratuita — e este guia apresenta as 8 mais eficazes, em ordem de impacto, baseadas em pesquisa atualizada para 2026.
⚠️ Aviso de Afiliados: O TechPlayGrid é financiado pelos leitores. Quando você compra através dos nossos links, podemos ganhar uma comissão sem custo extra para você.
🔍 Por Que o Free Fire Trava?
FreeFire. Imagem de divulgação site oficial.
Antes de agir, identifique a causa. Há dois tipos principais de travamento:
Tipo
Como identificar
Causa
Travamento de hardware
Trava no menu, na ilha de treino, desde o começo da partida
Celular fraco, RAM cheia, superaquecimento
Travamento de rede
Roda liso e de repente tudo “adianta” — personagens pulam
Conexão instável, ping alto
💡 Dica Pro: Se o jogo engasga já no menu ou na ilha de treino, é o celular. Se ele roda liso até uma briga de Clash Squad e aí o seu personagem teleporta pra trás, é a rede. Identifique qual é o seu antes de aplicar os fixes.
✅ Fix 1 — Ajuste as Configurações Gráficas no Próprio Jogo
Tempo: 3 minutos | Custo: Grátis | Impacto: ⭐⭐⭐⭐⭐
Este é o fix com maior impacto individual. Desce a qualidade gráfica do Ultra HD ou HD para um preset mais leve e mantém a taxa de quadros no mais alto que o menu deixar.
Configurações recomendadas no Free Fire para celular fraco:
Configuração
Valor Recomendado
Gráficos
Suave (celular fraco) ou Balanceado (celular médio)
Taxa de Quadros
Alto (60 FPS) ou Ultra (90 FPS se disponível)
Estabilizador de Taxa
Ativado
Sombras
Desativado
Modo Daltonismo
Desativado (se não precisar)
Efeito de Perspectiva
Desativado
💡 Dica Pro: Nunca coloque os gráficos no máximo tentando ter a imagem mais bonita. No Free Fire competitivo, a tela de 120Hz faz diferença na hora de virar a câmera rápido para encontrar o inimigo. A taxa de quadros alta sempre vale mais do que a qualidade visual.
✅ Fix 2 — Limpe o Cache do Free Fire
Tempo: 2 minutos | Custo: Grátis | Impacto: ⭐⭐⭐⭐⭐
O cache acumula arquivos temporários corrompidos que causam travamentos e falhas de carregamento. A Garena recomenda limpar o cache do jogo como primeiro passo oficial de suporte para travamentos.
Passo a passo (Android):
Feche o Free Fire completamente
Vá em Configurações → Aplicativos (ou “Gerenciar Apps”)
Encontre Free Fire na lista
Toque em Armazenamento
Toque em Limpar cache (não toque em “Limpar dados” — isso apaga suas configurações)
Reinicie o celular e abra o Free Fire
✅ Fix 3 — Feche Todos os Apps em Segundo Plano
Tempo: 1 minuto | Custo: Grátis | Impacto: ⭐⭐⭐⭐
WhatsApp, Instagram, YouTube em segundo plano consomem RAM — e o Free Fire compete por essa memória toda vez que carrega uma nova área do mapa.
Como fechar:
Toque no botão de Recentes (quadrado ou gesto de swipe)
Feche todos os aplicativos abertos
Abra o Free Fire sem abrir nenhum outro app antes
💡 Dica Pro: Feche os apps em segundo plano antes de cair na fila para o Free Fire MAX ter RAM para as texturas. Isso vale especialmente para aparelhos com 4GB ou 6GB de RAM.
✅ Fix 4 — Não Jogue com o Celular Carregando
Tempo: Imediato | Custo: Grátis | Impacto: ⭐⭐⭐⭐
Este fix surpreende muita gente. Evite jogar com o celular carregando, pois isto o aquece mais, causando uma perda de desempenho. Quando o celular superaquece, o processador reduz a velocidade automaticamente (thermal throttling) para se proteger — e é exatamente isso que causa queda de FPS progressiva durante a partida.
O calor destrói o FPS. Sempre jogue sem a capa se estiver carregando. A capa de silicone impede a dissipação de calor.
Regras anti-superaquecimento:
Carregue o celular antes da sessão de jogo, não durante
Retire a capinha ao jogar (especialmente capas grossas de silicone)
Não jogue em superfícies que retêm calor (cama, travesseiro, sofá de tecido)
Prefira superfícies duras e planas que dissipam calor
✅ Fix 5 — Ative as Opções de Desenvolvedor e Aceleração por GPU
Tempo: 5 minutos | Custo: Grátis | Impacto: ⭐⭐⭐⭐
Esta opção ajuda a otimizar os gráficos 2D com a GPU do seu dispositivo, potencializando o desempenho durante a gameplay.
Como ativar (Android):
Vá em Configurações → Sobre o telefone
Toque em Número de compilação 7 vezes seguidas (ativa as Opções de Desenvolvedor)
Volte para Configurações → Sistema → Opções de Desenvolvedor
Ative Renderização GPU forçada para aceleração 2D (Force GPU Rendering)
Ative também Limite de processos em segundo plano → Definir para No máximo 2 processos
⚠️ Atenção: As Opções de Desenvolvedor são recursos avançados. Só altere o que está descrito acima — mexer em outras configurações pode instabilizar o sistema.
✅ Fix 6 — Conecte ao Wi-Fi mais próximo do roteador (ou use dados móveis 4G/5G)
Tempo: Imediato | Custo: Grátis | Impacto: ⭐⭐⭐⭐
Se o seu travamento é de rede (personagem que teletransporta), a distância do roteador é a causa mais comum.
Caso esteja jogando via Wi-Fi (o que é mais recomendado), tente se posicionar o mais próximo do Modem, evitando o máximo de obstáculos e paredes entre os dois. Ficar próximo ao modem garante um melhor sinal e menos oscilações, garantindo uma conexão de melhor qualidade.
Ordem de prioridade de conexão:
Wi-Fi próximo ao roteador — melhor estabilidade
4G/5G com sinal forte — alternativa válida se o Wi-Fi for fraco
Wi-Fi distante com paredes e obstáculos — pior opção, causa pings altos
✅ Fix 7 — Libere Espaço de Armazenamento Interno
Tempo: 5 minutos | Custo: Grátis | Impacto: ⭐⭐⭐
O Free Fire atualiza e fica mais pesado toda temporada. Não compre celulares com 64GB de armazenamento. O mínimo para jogar com tranquilidade em 2026 é 128GB. Com pouco espaço livre, o jogo não consegue gravar arquivos temporários — causando stutters durante o carregamento de novas áreas.
Meta: Mantenha pelo menos 2–3GB livres para o Free Fire funcionar corretamente.
Como liberar espaço rápido:
Delete fotos e vídeos antigos do WhatsApp (maior causa de armazenamento cheio)
Use o Google Fotos para fazer backup e apagar as mídias do celular
Desinstale apps que você não usa
Em Configurações → Armazenamento, use a limpeza automática do Android
✅ Fix 8 — Atualize o Free Fire e o Sistema Android
Tempo: 5 minutos | Custo: Grátis | Impacto: ⭐⭐⭐
Versões desatualizadas do Free Fire podem ter bugs de desempenho que já foram corrigidos nas atualizações mais recentes. O mesmo vale para o Android — atualizações do sistema frequentemente melhoram o gerenciamento de memória e thermal throttling.
Para atualizar o Free Fire:
Abra a Play Store → Seus jogos e apps
Encontre o Free Fire → Atualizar
Para atualizar o Android:
Configurações → Sobre o telefone → Atualização do sistema
Instale qualquer atualização disponível
📊 Resumo dos Fixes por Impacto
Fix
Impacto
Tempo
Custo
Ajustar gráficos no jogo
⭐⭐⭐⭐⭐
3 min
Grátis
Limpar cache do Free Fire
⭐⭐⭐⭐⭐
2 min
Grátis
Fechar apps em 2º plano
⭐⭐⭐⭐
1 min
Grátis
Não jogar carregando
⭐⭐⭐⭐
Imediato
Grátis
Ativar GPU nas Dev Options
⭐⭐⭐⭐
5 min
Grátis
Posição próxima ao Wi-Fi
⭐⭐⭐⭐
Imediato
Grátis
Liberar armazenamento
⭐⭐⭐
5 min
Grátis
Atualizar FF e Android
⭐⭐⭐
5 min
Grátis
📱 Ainda Travando? Pode Ser a Hora de Trocar de Celular
Free Fire. Imagem de divulgação site oficial.
Se você aplicou todos os fixes acima e o jogo ainda trava, o hardware do seu celular é o limite real.
A regra de ouro é: fuja de celulares com apenas 4GB de RAM se você quer jogar competitivamente. Eles até rodam o jogo no primeiro mês, mas assim que você encher o aparelho de fotos e vídeos de WhatsApp, o jogo vai começar a fechar sozinho.
O que você precisa para o Free Fire rodar bem em 2026:
RAM: Mínimo 6GB (8GB ideal)
Tela: 90Hz ou 120Hz (faz diferença real na hora de mirar)
Processador: Snapdragon 6xx ou Dimensity 6xxx ou superior
Armazenamento: 128GB mínimo
🛒 Celulares Verificados para Free Fire — Amazon.com.br e KaBuM
🥇 Melhor Custo-Benefício — Xiaomi Redmi Note 14 4G
Tela AMOLED 120Hz, Helio G99-Ultra, 8GB RAM, 256GB
O Xiaomi Redmi Note 14 4G é o melhor barato para Free Fire: tela AMOLED de 120Hz, Helio G99-Ultra com 8GB de RAM e 256GB de armazenamento. Roda Free Fire a 60 FPS no máximo de gráficos.
O POCO X7 Pro se posiciona bem para quem busca os melhores celulares custo-benefício para jogos 2026, priorizando desempenho em jogos pesados e competitivos.
Dimensity 6100+, 6GB RAM, bateria 6000 mAh, até 9h de jogo contínuo
O Samsung Galaxy M35 5G garante até 9 horas de jogatina contínua, sendo uma das melhores baterias da categoria. O desempenho é suficiente para rodar Free Fire no gráfico Alto sem travamentos.
Aplicativos de booster de RAM realmente ajudam no Free Fire? A maioria não ajuda e alguns podem comprometer sua conta. É importante otimizar sem recorrer a aplicativos de terceiros, que podem comprometer sua conta. Os fixes nativos do Android neste guia são mais seguros e igualmente eficazes.
Qual gráfico usar no Free Fire para não travar? Para celulares com menos de 6GB de RAM: Suave + Taxa de Quadros Alta. Para 6–8GB RAM: Balanceado + Taxa Alta. Para 8GB+ com processador bom: HD + 60 FPS ou mais.
Por que o Free Fire trava mais depois de uma atualização? Novas atualizações frequentemente adicionam conteúdo que exige mais do hardware. Aplicar os fixes de gráfico (Fix 1) e limpar o cache (Fix 2) logo após cada atualização resolve a maioria dos casos.
Jogar no 4G é melhor que no Wi-Fi? Depende. Um 4G/5G forte e estável pode ter ping menor que um Wi-Fi fraco com interferência. O Wi-Fi é melhor quando você está próximo do roteador. O 4G é melhor quando o Wi-Fi é instável ou você está longe do modem.
Quantos GB de RAM são necessários para jogar Free Fire sem travar em 2026? Para jogos, o ideal é que o celular tenha pelo menos 6GB de RAM, garantindo desempenho fluido na maioria dos títulos populares. Um celular de 4GB de RAM consegue rodar Free Fire, mas pode travar quando o armazenamento está cheio.
Última atualização: julho de 2026 | Testado no Android 14 e 15
⚠️ Aviso de Afiliados: O TechPlayGrid participa do Programa de Associados da Amazon.com.br e outros programas de afiliados. Ganhamos comissão em compras qualificadas sem custo extra para você.
🏷️ Metadados SEO
Título: Free Fire Travando no Celular? 8 Soluções Gratuitas
Meta Descrição: Free Fire travando no celular em 2026? Veja 8 fixes gratuitos testados — de limpar cache a ajustar gráficos — antes de pensar em trocar de aparelho. Passo a passo.
Tags: free fire travando celular, como resolver lag free fire 2026, free fire lento android, fix free fire travando, free fire cache limpar, otimizar celular free fire, free fire fps baixo android, como melhorar desempenho free fire
Parágrafo de Resumo: Se o Free Fire está travando no seu celular em 2026, há uma boa chance de a causa ser software — não hardware. Este guia apresenta 8 soluções gratuitas em ordem de impacto: ajuste de gráficos no jogo, limpeza de cache, fechamento de apps em segundo plano, controle de temperatura, ativação da aceleração por GPU nas Opções de Desenvolvedor, posicionamento em relação ao Wi-Fi, liberação de armazenamento e atualização do sistema. Se nada resolver, apresentamos os três celulares com melhor custo-benefício para Free Fire em 2026, verificados na Amazon.com.br e na KaBuM.
Your PS5 used to be quiet. Now it sounds like a jet engine mid-session, or worse — it starts loud, then shuts down on its own. Before you pack it up and ship it for repair, you need to know something: the majority of loud PS5 cases are fixable at home in under 20 minutes, for free.
This guide covers every safe fix in order of likelihood and impact — from dust cleaning to firmware updates — and only recommends professional repair when genuinely necessary.
💡 Important: The PS5 uses liquid metal (not standard thermal paste) between the APU and heatsink. Do NOT attempt to open the PS5 or reapply thermal material yourself. This is electrically conductive and can permanently damage your motherboard. That’s what repair shops are for. Everything in this guide is safe to do at home without opening the console.
⚠️ Affiliate Disclosure: TechPlayGrid is reader-supported. When you buy through links on our site, we may earn an affiliate commission at no extra cost to you.
🔍 Why Is Your PS5 Fan So Loud?
For illustrative purposes only. Playstation 5
Extremely loud fan noise, hot air output feeling excessive, performance drops, games crashing — these are the most common symptoms. The most common cause: dust builds up on the heatsink and fans over time, reducing airflow and insulating components that need to stay cool.
Here’s the full diagnosis map:
Symptom
Most Likely Cause
Fix
Loud fan from the start
Placement/airflow blocked
Fix 1
Fan gets loud after 20–30 min
Dust buildup or thermal issue
Fix 2 + 3
Loud then shuts off
Thermal protection triggered
Fix 2 + 3
Grinding or clicking sound
Fan bearing degrading
Professional repair needed
Loud in ALL games since update
Firmware issue
Fix 4
Loud only in demanding games
Normal behavior (monitor temps)
Fix 5
✅ Fix 1 — Check Placement and Airflow (Start Here)
Time: 2 minutes | Cost: Free | Impact: ⭐⭐⭐⭐⭐
Soundbars laid directly on top of the console are a common cause of overheating reports. Also check that the front intake isn’t blocked by cables or other peripherals. The console pulls air in from the front and pushes it out the back and top; restricting either end disrupts the whole airflow path.
PS5 clearance requirements:
Sides: Minimum 10cm clearance on each side
Back: Minimum 10cm from wall
Top (horizontal): Must not be stacked under other electronics
Stand: Always use the included stand — never lay PS5 flat on carpet
Worst placement mistakes:
Inside an enclosed TV cabinet without ventilation
Flat on carpet (blocks bottom intake)
Against a wall with the vents facing the wall
Under another console or soundbar
Move the PS5 to an open, well-ventilated area before doing anything else. This alone resolves the issue for a significant portion of users.
✅ Fix 2 — Clean the Dust Ports (Safe, No Screwdriver Needed)
Time: 10 minutes | Cost: Free–$15 | Impact: ⭐⭐⭐⭐⭐
Sony actually designed the PS5 for customer-cleanable intake vents. The white side covers slide off easily. Stand the PS5 vertically, slide each white side cover up and off. You’ll see two circular intake dust ports. Use compressed air to blast dust out of them. Hold the can upright and use short bursts.
Step-by-step:
Power off completely and unplug from the wall
Wait 15–20 minutes for components to cool
Stand the PS5 vertically
Slide the white covers off — push one corner, lift the opposite corner
You’ll see two circular dust collection ports (black recessed holes)
Insert the nozzle of compressed air and blast in short bursts
Also clean the rear exhaust vent with short bursts from the outside
After cleaning, adding a mesh dust filter to the PS5’s intake ports stops dust from accumulating as quickly. High-density mesh filters cover the PS5’s air intake vents, blocking debris while keeping airflow smooth, reducing dust buildup, enhancing the heatsink barrier effect, and maintaining the console’s operation.
💡 Pro Tip: Dust filters slightly reduce airflow, so clean them every 2–3 months. The tradeoff is worth it — you’ll need to deep-clean the console far less often.
✅ Fix 4 — Update PS5 System Software
Time: 5 minutes | Cost: Free | Impact: ⭐⭐⭐
Sony has shipped fan-behavior tweaks in past updates, so an out-of-date console can run hotter or louder than it needs to. As of April 2026, the current firmware is PS5 system software 26.03-13.20.00. If you’re not on the latest version, updating can directly improve fan behavior.
Connect PS5 to the internet
Go to Settings → System → System Software → System Software Update and Settings
Select Update System Software → Update via Internet
Install any available update and restart
✅ Fix 5 — Change Performance Mode in PS5 Settings
Time: 2 minutes | Cost: Free | Impact: ⭐⭐⭐
Some PS5 games push the hardware very hard in “Performance Mode” (high frame rate at 60–120 FPS), which causes the fan to spin faster to keep up. Switching to “Resolution Mode” (4K, lower frame rate) often runs the GPU at a more consistent load — which paradoxically can be quieter because there are fewer sudden load spikes.
To change per-game:
On the PS5 home screen, highlight the game
Press Options → Game Presets → Performance Mode or Resolution Mode
Select Resolution Mode and test if fan noise reduces
💡 Pro Tip: This is a tradeoff — you’ll lose frame rate for quieter operation. Most single-player games look and feel excellent at 30–40fps resolution mode, so it’s worth trying for story games.
If the fan behavior changed after a system update or power outage, corrupted system files can cause abnormal fan behavior. Rebuilding the database fixes this without deleting your saves.
Turn off the PS5 completely (not rest mode)
Hold the power button until you hear two beeps (about 7 seconds) — Safe Mode starts
Connect a controller via USB-C
Select Rebuild Database (Option 5)
Wait for it to complete — can take 5–30 minutes depending on storage
💡 Pro Tip: This does NOT delete your games or saves. It reorganizes the drive index, similar to defragmenting a traditional hard drive.
📊 Fix Priority Summary
Fix
Cost
Impact
Time
Check placement and airflow
Free
⭐⭐⭐⭐⭐
2 min
Clean dust ports with compressed air
Free–$15
⭐⭐⭐⭐⭐
10 min
Add dust filter kit
~$10–20
⭐⭐⭐⭐
5 min
Update system software
Free
⭐⭐⭐
5 min
Switch to Resolution Mode
Free
⭐⭐⭐
2 min
Rebuild PS5 database
Free
⭐⭐⭐
10 min
🔧 When to Send It for Repair
After trying everything above, your PS5 may need professional service if:
Fan makes grinding, clicking, or buzzing sounds — the fan bearing is failing
Console shuts down within minutes even in a clean, open setup
Fan is loud even in PS5 menus with no game loaded
The PS5 uses liquid metal instead of traditional thermal paste, which is great when fresh and terrible when it dries up or pumps out of position. When liquid metal goes bad, the APU loses thermal contact with the heatsink — the fan can be brand new and it won’t matter. This requires professional repair.
Check if your PS5 is still under warranty first:
PS5 comes with a 1-year limited warranty from Sony
Extended warranties via retailers may cover up to 3 years
Is it normal for the PS5 fan to be loud? Some fan noise is normal during demanding games. However, if the PS5 is significantly louder than when it was new, or makes grinding or clicking sounds, that indicates dust buildup or a hardware issue that needs attention.
How often should I clean my PS5? A PS5 in a dusty room or with pets will accumulate dust faster. For most households, cleaning the dust ports every 3–4 months is sufficient. If you have pets or live in a dusty environment, every 6–8 weeks.
Can I use a vacuum cleaner to clean my PS5? Avoid regular household vacuums — the static electricity they generate can damage electronics. Use compressed air or a specialized electric air duster instead.
Will cleaning my PS5 void the warranty? Removing the outer white covers to access the dust ports is safe and does not void the warranty — Sony designed it for this. Opening the inner chassis with screwdrivers does void the warranty.
My PS5 is loud even with no game running — what does that mean? If the fan runs at high speed even in the PS5 menu, it usually indicates a thermal sensor or airflow issue. Try Fix 1 (placement) and Fix 2 (dust cleaning) first. If neither helps, it may be a failing fan or degraded liquid metal — professional repair is recommended.
Last updated: July 2026 | Verified for PS5, PS5 Slim, and PS5 Pro
⚠️ Affiliate Disclosure: TechPlayGrid participates in the Amazon Associates Program and other affiliate programs. We earn a commission on qualifying purchases at no extra cost to you.
🏷️ SEO Metadata
Title: Why Is My PS5 So Loud? New Fixes Before You Send for Repair
Meta Description: PS5 fan loud as a jet engine? Try these 6 safe fixes — no screwdriver needed — before paying for repair. Cleaning, firmware, and placement tips for 2026.
Tags: ps5 fan loud fix, why is my ps5 so loud, ps5 overheating fix 2026, ps5 fan noise solution, ps5 cleaning dust, ps5 loud fan no repair, ps5 fan fix no tools, ps5 thermal fix
Post Summary: A loud PS5 fan is one of the most common complaints from console owners — and in most cases, it’s fixable at home for free. This guide covers six safe fixes in order of impact: correcting airflow placement, cleaning the built-in dust ports with compressed air (no screwdrivers required), adding a dust filter kit, updating system software, switching performance modes, and rebuilding the PS5 database. Products verified on Amazon US. Professional repair is only recommended for grinding sounds or shutdowns that persist after all fixes are applied.
Your Fortnite runs fine in the lobby. Then the match starts, build fights heat up, and suddenly your frames crater. You die before you can even react. Sound familiar?
The frustrating reality: most Fortnite FPS drops are caused by software settings, not weak hardware. A GTX 1060 that barely hits 45 FPS in default settings can realistically reach 80–100+ FPS with the right tweaks — no new hardware required.
This guide follows the same format as our Discord lag fix for Valorant that helped thousands of players: free fixes first, ordered by impact, hardware upgrades only if nothing else works.
⚠️ Affiliate Disclosure: TechPlayGrid is reader-supported. When you buy through links on our site, we may earn an affiliate commission at no extra cost to you.
🔍 Why Does Fortnite Drop FPS?
For illustrative purposes only. Fortnite
Before fixing anything, identify the root cause. FPS drops in Fortnite in 2026 come from four main culprits:
Cause
Symptom
Fix Category
Wrong rendering mode
Low FPS across the board
In-game settings
CPU bottleneck
GPU sits under 80% while FPS tanks
Settings + Windows tweaks
Background apps eating resources
FPS drops mid-match, not in menus
Windows
Thermal throttling
FPS fine at first, then drops after 10–15 min
Hardware maintenance
💡 Pro Tip: Before changing any setting, enable the FPS counter. In Fortnite: Settings → Video → Show FPS → On. If your FPS drops only during fights, it’s a CPU spike. If it drops constantly, it’s a settings or rendering issue.
✅ Fix 1 — Switch to Performance Mode (Biggest Single Gain)
Fortnite’s Performance Mode uses a simplified rendering pipeline that bypasses DirectX 11/12 overhead entirely. On most PCs — especially older or mid-range hardware — this single change can double FPS on budget GPUs. A GTX 1060 at 45 FPS can realistically hit 80–100+ FPS.
How to enable:
Open Fortnite → Settings (gear icon) → Video
Find Rendering Mode
Change to Performance Mode
Restart Fortnite completely (required for the change to take effect)
💡 Pro Tip: Performance Mode uses simplified rendering and lower-detail assets. On mid-range PCs it often doubles FPS versus DX12. Restart the game after switching. View Distance is the one setting worth keeping up — it affects what you can actually see in fights.
Once you’re in Performance Mode, these settings maximize your FPS. Set shadows, Nanite and Ray Tracing to OFF, effects and post-processing to Low, NVIDIA Reflex ON + Boost, and 3D Resolution to 100% at 1920×1080.
Full recommended settings table:
Setting
Recommended Value
Why
Rendering Mode
Performance
Biggest FPS gain
3D Resolution
100% (drop to 80% if needed)
Reduces pixel load
View Distance
Medium or Far
Affects gameplay visibility
Shadows
Off
One of the most GPU-intensive effects
Anti-Aliasing
Off
Expensive, minimal benefit in Performance Mode
Textures
Low
Reduces VRAM pressure
Effects
Low
GPU savings during fights
Post Processing
Low
Applies filters that cost frames
V-Sync
Off
Adds input lag; use frame cap instead
Ray Tracing
Off
Only for very high-end GPUs
NVIDIA Reflex
On + Boost
Reduces input latency significantly
FPS Cap
Match your monitor Hz
Prevents unnecessary GPU load
✅ Fix 3 — Lower Your Mouse Polling Rate
Time: 2 minutes | Difficulty: Easy | Impact: ⭐⭐⭐⭐
This one surprises most players. Most gaming mice default to a 1000Hz polling rate. This means your mouse sends 1000 signals per second to your CPU even when you’re just moving it slightly. During fights, this extra load adds up. If your FPS drops specifically when moving your camera, try dropping the polling rate to 500Hz in your mouse software. Many players see immediate improvement.
Check your mouse’s software (Logitech G HUB, Razer Synapse, SteelSeries GG) and change the polling rate from 1000Hz to 500Hz.
✅ Fix 4 — Clear Shader Cache
Time: 3 minutes | Difficulty: Easy | Impact: ⭐⭐⭐⭐
Fortnite uses Unreal Engine 5, which compiles shaders as you play. After Windows or GPU driver updates, the shader cache can become corrupted or outdated, causing stutters and FPS spikes — especially at the start of matches.
For NVIDIA:
Open NVIDIA Control Panel
Go to Manage 3D Settings
Click Shader Cache Size → Set to Unlimited
Then clear the existing cache: Windows Search → %localappdata%\NVIDIA\DXCache → Delete contents
For AMD:
Open AMD Adrenalin
Go to Performance → Shader Cache
Click Reset Shader Cache
✅ Fix 5 — Disable Xbox Game Bar and Background Apps
Time: 3 minutes | Difficulty: Easy | Impact: ⭐⭐⭐⭐
Windows runs several processes in the background that compete with Fortnite for CPU and RAM resources.
Disable Xbox Game Bar:
Press Windows + I → Gaming → Xbox Game Bar
Toggle Off
Close background apps before playing:
Press Ctrl + Shift + Esc → Task Manager
End tasks for: browsers, Discord (or switch to phone), Spotify, Steam downloads, Windows Update
Right-click on Fortnite process → Set Priority → High
⚠️ Warning: Only set Fortnite to “High” priority, not “Real Time.” Real Time can destabilize Windows.
✅ Fix 6 — Enable XMP/EXPO in BIOS (If Your RAM Isn’t Running at Rated Speed)
Time: 5 minutes | Difficulty: Medium | Impact: ⭐⭐⭐⭐
This is one of the most overlooked fixes. Most PCs ship with RAM running at 2133MHz even if the sticks are rated for 3200MHz or faster. Enabling XMP (Intel) or EXPO (AMD) tells the motherboard to run the RAM at its advertised speed — and in Fortnite, this directly improves frame pacing.
Restart PC → Press Delete or F2 to enter BIOS
Find XMP or EXPO setting (usually under Advanced Memory or OC settings)
Enable it → Save and exit
💡 Pro Tip: This is free and safe. XMP/EXPO profiles are tested by the RAM manufacturer and won’t damage your system.
✅ Fix 7 — Update GPU Drivers (But Don’t Always Use the Newest)
Driver updates matter, but not every new driver is better. Some GPU driver updates break Fortnite specifically. If your FPS dropped after a Windows or GPU driver update, that’s your answer. Roll back to the previous driver version and test.
To update safely:
NVIDIA: Download Game Ready drivers from nvidia.com → Use “Custom” install → Check “Clean Installation”
AMD: Download Adrenalin Edition from amd.com → Use factory reset option
To roll back:
Device Manager → Display Adapters → Right-click GPU → Properties → Driver → Roll Back Driver
✅ Fix 8 — Check for Thermal Throttling
Time: 5 minutes | Difficulty: Easy | Impact: ⭐⭐⭐⭐
If your FPS starts fine and then drops after 10–15 minutes, your CPU or GPU is overheating and throttling performance to protect itself.
Download MSI Afterburner (free) and monitor:
CPU temperature: Should stay under 85°C
GPU temperature: Should stay under 85°C
If temps hit 90°C+:
Clean dust from PC fans and vents with compressed air
Ensure PC has adequate airflow (not inside a tight desk enclosure)
Check that all case fans are spinning
📊 Fix Priority Cheat Sheet
Fix
Impact
Time
Difficulty
Switch to Performance Mode
⭐⭐⭐⭐⭐
2 min
Easy
Apply optimized in-game settings
⭐⭐⭐⭐⭐
5 min
Easy
Lower mouse polling rate to 500Hz
⭐⭐⭐⭐
2 min
Easy
Clear shader cache
⭐⭐⭐⭐
3 min
Easy
Disable Xbox Game Bar + close apps
⭐⭐⭐⭐
3 min
Easy
Enable XMP/EXPO in BIOS
⭐⭐⭐⭐
5 min
Medium
Update or roll back GPU drivers
⭐⭐⭐
10 min
Easy
Check thermal throttling
⭐⭐⭐⭐
5 min
Easy
💻 Still Dropping Frames? Consider These Hardware Upgrades
For illustrative purposes only. Fortnite
If you’ve applied every fix above and still can’t hit consistent frames, your hardware is the true bottleneck.
Option A — Add More RAM (Under $50)
Only if RAM is your bottleneck. If Task Manager shows usage above 90% while gaming, more RAM will help. If usage is below 80%, adding more will not improve FPS. However, enabling XMP/EXPO to run your existing RAM at its rated speed almost always helps frame times.
Fortnite + Windows + background apps ideally need 16GB.
Playing Fortnite on a hard drive causes asset streaming issues — textures load slowly, which causes hitching and stutters. An SSD eliminates this entirely.
If you’re pushing 200+ FPS but gaming on a 60Hz monitor, you’re not seeing any of those extra frames. A 144Hz display is the minimum for competitive Fortnite.
Why does my Fortnite FPS drop only during fights? This is a CPU spike, not a GPU issue. Fortnite’s build system and player physics are CPU-heavy. During intense fights with multiple players building and shooting, CPU usage spikes. Fix 2 (optimized settings) and Fix 5 (closing background apps and prioritizing Fortnite in Task Manager) address this directly.
Does Performance Mode make Fortnite look bad? Performance mode remains mandatory for competitive play in 2026. Epic has refined it significantly — the visual downgrade is minimal compared to launch, but the performance gains are still 40–60% in complex scenarios.
Should I use DX11, DX12, or Performance Mode? Performance Mode for maximum FPS on most systems, DX12 if you want better visuals with shader pre-compilation, DX11 mainly as a fallback for stability issues.
Will a VPN help with Fortnite FPS drops? No — VPNs address ping (network latency), not FPS (local rendering performance). They’re separate issues.
My FPS is fine but the game still feels laggy — why? This is likely a frame pacing issue, not an FPS problem. A high average frame rate can hide a miserable experience. A single bad frame can wreck the illusion of smoothness even when the average looks healthy. Enable V-Sync off, use an FPS cap, and enable NVIDIA Reflex or AMD Anti-Lag to address this.
Last updated: July 2026 | Fixes verified for Fortnite Chapter 6
⚠️ Affiliate Disclosure: TechPlayGrid participates in the Amazon Associates Program and other affiliate programs. We earn a commission on qualifying purchases at no extra cost to you.
🏷️ SEO Metadata
Title : How to Fix FPS Drops in Fortnite — No Upgrade Needed
Meta Description : Fortnite FPS dropping mid-fight? These 8 free fixes — starting with Performance Mode — can double your frames without buying new hardware. Step-by-step guide for 2026.
Tags: fortnite fps drops fix, fortnite performance mode 2026, how to fix lag fortnite pc, boost fps fortnite no upgrade, fortnite low end pc settings, fortnite fps boost 2026, fix fortnite stuttering
Post Summary: Fortnite FPS drops during fights are one of the most common PC gaming complaints in 2026 — and most of them are fixable without spending a cent. This guide walks through 8 free fixes in order of impact: switching to Performance Mode (which can double frames on older GPUs), applying the optimal in-game settings, clearing shader cache, lowering mouse polling rate, enabling XMP in BIOS, and checking for thermal throttling. Hardware upgrade options are included at the end for players who’ve exhausted the free fixes.
Small room. Limited budget. Big gaming ambitions. Sound familiar?
Whether you’re in a dorm, a studio apartment, or a shared bedroom, building a functional gaming setup in a tight space is completely doable under $500 — but only if you make the right choices. The wrong desk wastes floor space. The wrong monitor stand wastes desk space. And the wrong cable management turns everything into a mess.
This guide gives you a tier-based plan for every budget scenario, from a no-frills $200 starter to a complete $500 small-room battlestation, with all products verified on Amazon US as of July 2026.
⚠️ Affiliate Disclosure: TechPlayGrid is reader-supported. When you buy through links on our site, we may earn an affiliate commission at no extra cost to you.
📐 Before You Buy Anything — Measure First
This sounds obvious, but most people skip it and regret it.
Three measurements you must take before ordering:
Measurement
Why It Matters
Wall width available
Determines max desk width
Depth from wall to chair position
Ensures the desk fits without blocking foot traffic
Distance from seated eyes to wall
Confirms monitor distance will be comfortable
💡 Pro Tip: For most small rooms, a desk between 40–47 inches wide is the sweet spot. It provides enough room for a keyboard, mouse, and single monitor without eating your entire wall. Anything under 40″ feels cramped once peripherals are added.
🖥️ Choosing the Right Desk Shape for a Small Room
Desk Shape
Best For
Floor Footprint
Straight rectangular
Narrow walls, beside a bed
Minimal
L-shaped / corner
Empty corners, more surface area
Moderate
Wall-mounted floating
Absolute minimum space, renters OK
Lowest possible
For rooms under 10×10 feet, a corner desk or a compact straight desk (40–47″) is almost always the better choice than a large straight desk.
💰 Full Setup Builds by Budget
🟢 Tier 1 — The $200 Starter Setup
Perfect for: First gaming setup, dorm room, shared bedroom
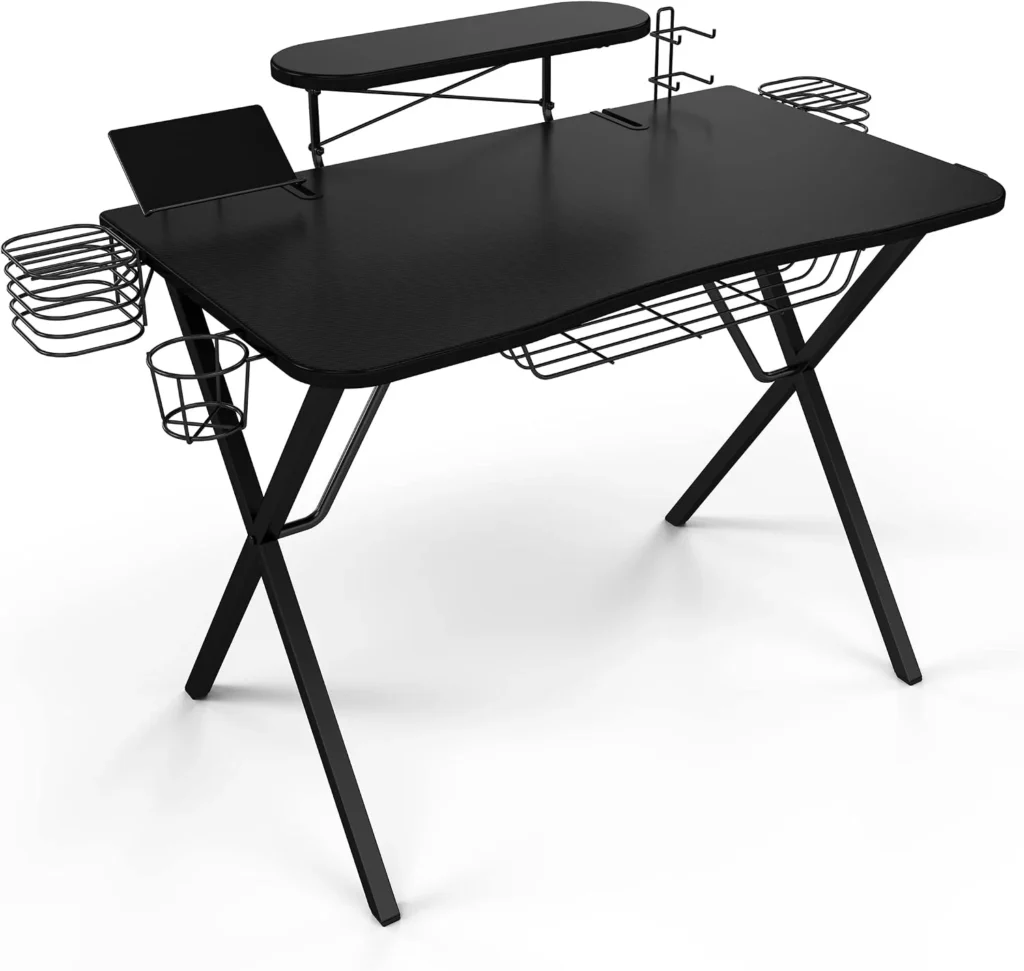
For illustrative purposes only. Model: Atlantic Gaming Desk Pro
The most organized compact gaming desk under $100. Built-in monitor riser, 10 accessory hooks, controller holder, and cable management channels. The surface area is limited (~36″), but for a starter single-monitor setup it’s purposefully designed and far more organized than a generic desk.
Price: ~$70–$90
Size: ~36″ W × 22″ D
Best for: Single monitor, minimal setup
Monitor: Whatever you have, or start here If you don’t have a monitor yet and are on a tight budget, the 24″ 1080p 75Hz IPS category starts around $90–$110 on Amazon and represents the floor for a decent gaming experience.
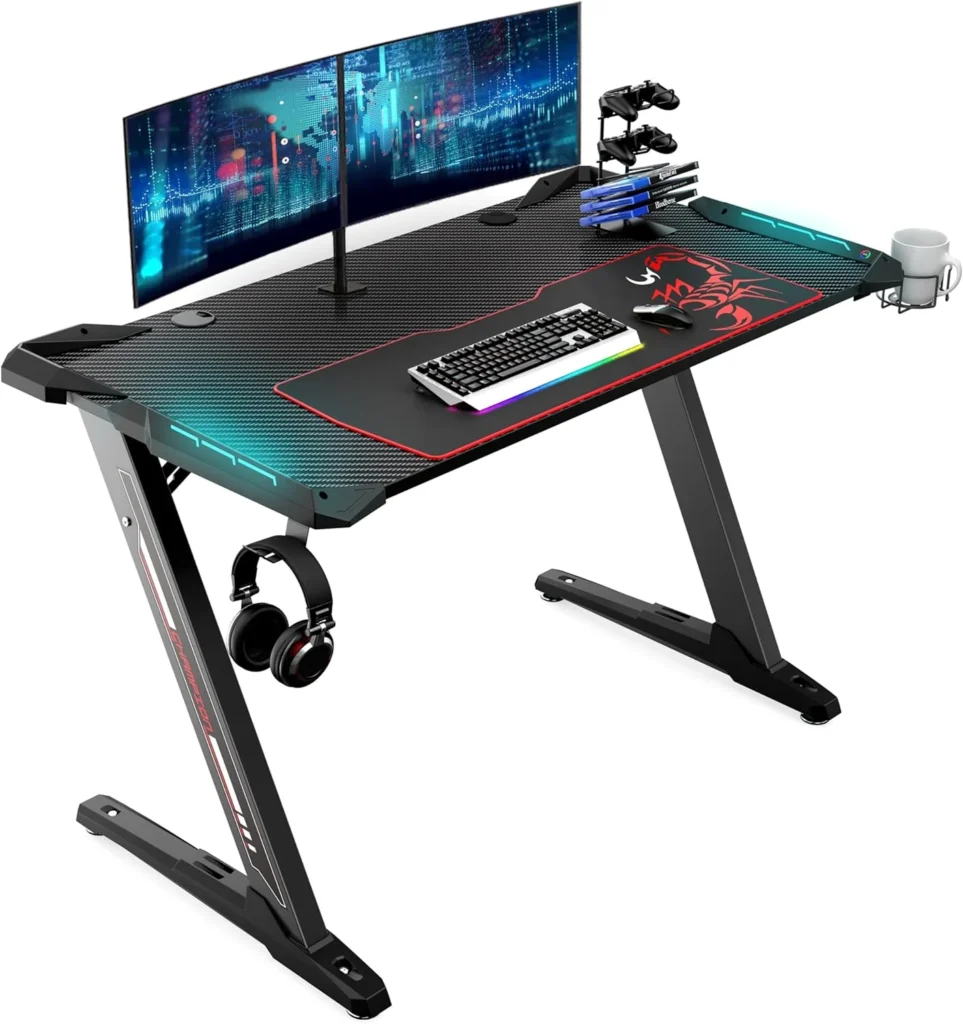
For illustrative purposes only. Model: Eureka Ergonomic Gaming Desk
Z-shaped carbon fiber surface, RGB strip, full-length mouse pad surface built in, and a monitor riser that runs the entire width. At 40 inches, it fits most small rooms while still feeling like a “real” gaming desk. The built-in full-length mouse pad is a genuine convenience.
Price: ~$110–$140
Size: ~40″ W × 24″ D
Best for: Single-monitor gaming, streamer aesthetics on a budget
This is the highest-ROI purchase for a small desk. A monitor arm removes the monitor stand entirely, freeing 10–12 inches of usable desk space. The VIVO arm is one of the most consistently well-reviewed on Amazon at under $35.
Price: ~$25–$40
Compatibility: Most monitors with VESA 75×75 or 100×100mm mount
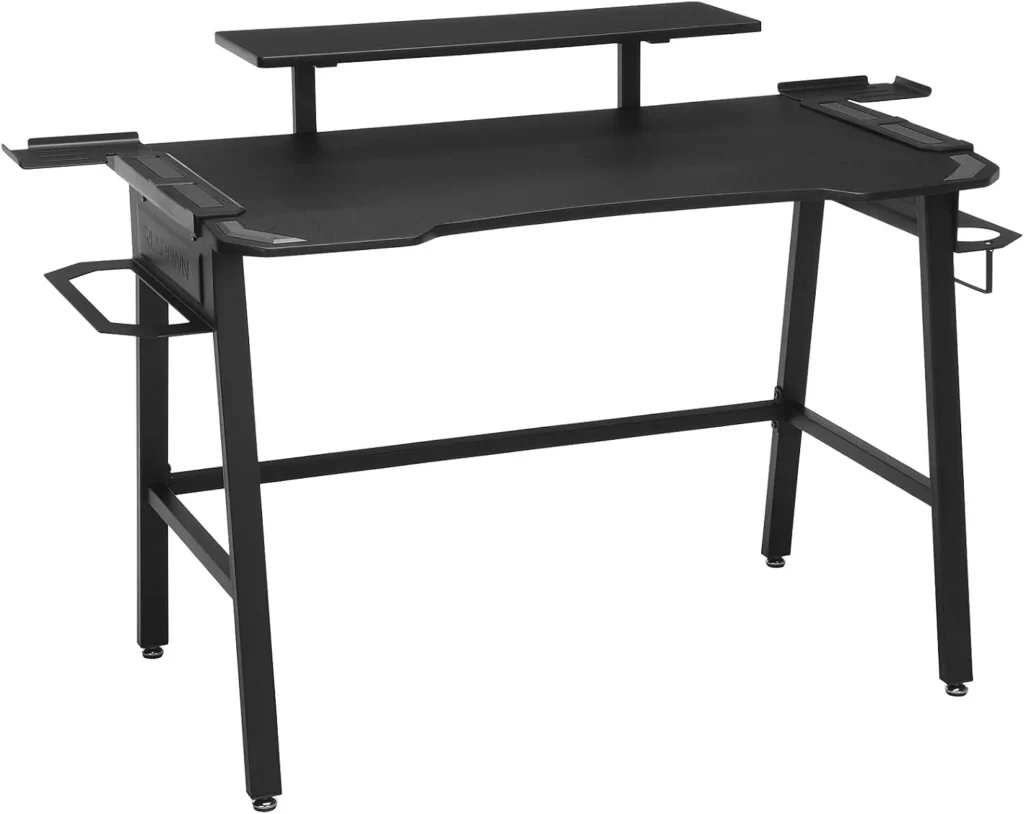
For illustrative purposes only. Model: Respawn Gaming Desk
The best value L-shaped desk under $150 for small rooms. Carbon fiber texture, raised monitor shelf (frees desk surface below), integrated cup holder and headset hook. The L configuration fills a corner efficiently — the highest surface-area-to-floor-footprint ratio available.
Price: ~$110–$150
Size: L-shape, ~56″ × 52″
Best for: Two-monitor setups, corner rooms, gamers who also work from home
Wall Shelves: IKEA LACK 2-Pack (above desk) Mounting two LACK shelves above the monitor keeps controllers, headsets, and decorative items off the desk entirely. Approximately $15–$20 total. Available at IKEA or via Amazon third-party.
Syncs to on-screen content in real time, reduces eye strain, creates premium atmosphere
Compact 65% Mechanical Keyboard Switching from a full-size keyboard to a 65% layout saves 4–5 inches of horizontal desk space. The Keychron K6 is the most recommended at this size.
What’s the best desk size for a small gaming room? 44–47 inches wide is the sweet spot for single-monitor setups in small rooms. It’s spacious enough to game comfortably but doesn’t dominate the wall.
Is an L-shaped desk good for small rooms? Yes, if you have a corner available. An L-shape uses corner space that’s usually wasted and gives you significantly more usable surface area per square foot of floor space consumed.
Do I need a monitor arm on a small desk? Highly recommended. A monitor arm removes the stand, freeing 10–12 inches of desk depth — transformative on compact desks.
How do I manage cables on a small gaming desk? Combine three things: a velcro cable bundle for the desk itself, an under-desk cable tray for power strips and excess length, and adhesive clips along the wall for the vertical run.
Can I build a good gaming setup in a 10×10 room? Absolutely. A corner desk with a monitor arm and smart vertical storage (wall shelves above the desk) makes a 10×10 room feel spacious. The key is keeping the floor clear and going vertical with storage.
Last updated: July 2026 | Products verified on Amazon US
⚠️ Affiliate Disclosure: TechPlayGrid participates in the Amazon Associates Program and other affiliate programs. We earn a commission on qualifying purchases at no extra cost to you.
🏷️ SEO Metadata
Title: Small Room Gaming Setup: Best Gear Under $500 (2026)
Meta Description: Cramped room, big gaming goals? This guide builds the perfect small-room gaming setup under $500 in 3 budget tiers — all products verified on Amazon US July 2026.
Tags: small room gaming setup, gaming setup under 500, compact gaming desk 2026, gaming setup small bedroom, best gaming desk small room, budget gaming setup, small gaming room ideas
Post Summary: A small room doesn’t have to mean a compromised gaming setup. This guide walks through three budget tiers — $200 starter, $350 mid-range, and $500 battlestation — with product picks verified on Amazon US as of July 2026. From choosing the right desk shape and size for tight spaces to the highest-ROI upgrades like monitor arms and under-desk cable management, every recommendation is built to maximize your setup without overwhelming your room or your wallet.
Three hours into a session, your eyes start burning. Text on screen gets harder to read. By the end of the night, you’ve got a headache and your eyes feel like sandpaper. Sound familiar? The eye strain.
Eye strain during long gaming sessions is one of the most common complaints among gamers — and one of the most ignored. The good news: most of it is preventable, and half the fixes cost nothing. This guide covers every adjustment from free monitor settings to affordable gear that makes a real difference.
⚠️ Affiliate Disclosure: TechPlayGrid is reader-supported. When you buy through links on our site, we may earn an affiliate commission at no extra cost to you.
🔬 Why Gaming Causes Eye Strain
Understanding the cause helps you target the fix:
Cause
What Happens
High screen brightness
Forces pupils to constantly contract
Blue light emission
Suppresses melatonin, disrupts circadian rhythm and causes fatigue
Low refresh rate
Screen flicker (imperceptible but cumulative) strains eyes
Screen glare
Constant adjustment between bright reflections and dark screen content
Reduced blinking
We blink 66% less while staring at screens — leading to dry eyes
Wrong viewing distance
Too close forces sustained eye muscle effort
Poor room lighting
High contrast between dark room and bright screen exhausts pupils
✅ Free Fixes — Start Here
👁️ Fix 1 — Follow the 20-20-20 Rule
Every 20 minutes, look at something 20 feet away for 20 seconds. This relaxes the ciliary muscles in your eyes that stay contracted while focusing on a close screen.
Set a recurring timer on your phone. It sounds disruptive but becomes automatic within a week.
👁️ Fix 2 — Calibrate Your Monitor Brightness
Your monitor should not be brighter than the ambient light in your room. A display blazing at 300 nits in a dark room is a guaranteed headache by hour two.
Quick brightness test: Hold a white piece of paper next to your screen. If the screen looks brighter than the paper, your brightness is too high.
Recommended settings:
Brightness: Match to room lighting (typically 80–120 nits in dim rooms)
👁️ Fix 3 — Enable Night Mode / Blue Light Filter on Windows
Windows 10/11 has a built-in blue light filter called Night Light:
Settings → System → Display → Night Light
Set strength to 30–50%
Enable on a schedule (sunset to sunrise works well)
On macOS: System Settings → Displays → Night Shift
💡 Pro Tip: Don’t use Night Light at full strength during competitive gaming — it shifts colors too warmly and throws off your color perception. 30–40% strength is the sweet spot that reduces strain without distorting your display.
👁️ Fix 4 — Set Correct Monitor Height and Distance
Distance: Your monitor should be 50–70cm (20–28 inches) from your eyes
Height: The top of the screen should be at or slightly below eye level
Angle: Tilt the screen back 10–20 degrees
Most gamers sit too close. Increasing viewing distance is one of the fastest ways to reduce eye fatigue.
👁️ Fix 5 — Consciously Blink More
Put a sticky note on your monitor that says “BLINK.” Seriously — it works. Gamers blink so infrequently during sessions that eyes dry out significantly, causing burning and irritation that’s often mistaken for screen-related strain.
👁️ Fix 6 — Improve Room Lighting
Gaming in a completely dark room creates extreme contrast between the bright display and the black environment. Your eyes spend the whole session adjusting.
The fix: Add bias lighting behind your monitor. It raises the ambient brightness in your peripheral vision, reducing the contrast ratio your eyes have to process.
DIY version: put a lamp behind your monitor. Proper version: see the gear section below.
Bias lighting sits behind your monitor and projects a soft glow onto the wall. It reduces the perceived contrast between your bright screen and the dark room, which is one of the most effective ways to cut gaming-related eye fatigue.
The Govee Immersion version uses a camera to match the backlight color to your on-screen content in real time — it’s genuinely impressive and costs under $60.
ASUS Eye Care monitors include hardware-level blue light filtering (not just software), flicker-free backlighting, and ultra-low glare panels — all certified by TÜV Rheinland. The PA278QV is the best value in this category at 27″ 1440p.
If you wear glasses or find monitor software filters affect your color accuracy too much, dedicated gaming glasses are the alternative. Gunnar’s amber-tinted lenses filter blue light at the source — before it reaches your eyes.
💡 Pro Tip: Clear-lens blue light glasses (marketed heavily online) filter very little blue light — around 10–20%. Amber-tinted lenses like Gunnar’s filter 65%+. The tint is noticeable but eye fatigue drops significantly within the first week.
For gamers with chronically dry eyes, lubricating eye drops are a simple, immediate relief. Preservative-free formulas are gentler for frequent use. Apply before starting a long session and when eyes feel dry — not just after symptoms worsen.
📱 Monitor Calibration Tool — Datacolor SpyderX Pro
Most monitors ship with poor factory calibration — too bright, wrong gamma, incorrect white balance. A hardware calibration tool like the SpyderX Pro takes 5 minutes to create a custom profile that’s accurate, appropriately bright, and reduces unnecessary strain from oversaturated or too-bright settings.
Does higher refresh rate reduce eye strain? Yes — significantly. Lower refresh rates (60Hz) cause imperceptible flicker that accumulates over hours. 144Hz+ monitors are noticeably easier on the eyes, especially during fast motion.
Do blue light glasses actually work? Amber-tinted ones (65%+ blue light filtering) yes. Clear lens “gaming glasses” marketed without tint provide very limited benefit. The science on blue light and eye strain is still developing, but the practical benefits of amber glasses during extended sessions are widely reported.
Is OLED better for eye strain than IPS? OLED screens have true black levels (eliminating backlight bleed) and no PWM flicker, which reduces some forms of eye fatigue. However, they can be very bright at peak HDR and burn-in risk applies to static gaming UIs. For eye strain specifically, a well-calibrated IPS with flicker-free backlight is comparable.
How far should I sit from a 27″ monitor? 60–80cm (24–32 inches) is ideal for 27″ monitors. At 1440p resolution, text and detail remain sharp at this distance.
Should I game in a dark room or a lit room? A moderately lit room is best — not pitch dark, not blazing bright. Bias lighting behind the monitor bridges the gap perfectly.
Last updated: June 2026
⚠️ Affiliate Disclosure: TechPlayGrid participates in the Amazon Associates Program and other affiliate programs. We earn a commission on qualifying purchases at no extra cost to you.
🏷️ SEO Metadata
Title: Reduce Eye Strain in Long Gaming Sessions: Tips & Gear
Meta Description : Eyes burning after long gaming sessions? These free monitor settings and affordable gear picks can dramatically reduce eye strain — no doctor visit required.
Tags: eye strain gaming, reduce eye strain monitor, gaming eye fatigue, blue light filter gaming, bias lighting gaming, best monitor eye care, gaming glasses blue light
Post Summary: Eye strain during long gaming sessions isn’t inevitable — it’s preventable. This guide covers six free fixes (brightness calibration, Night Light, the 20-20-20 rule, room lighting) and the best affordable gear for gamers who need more: bias lighting, low-blue-light monitors, Gunnar glasses, and eye drops. Whether you have 5 minutes or $300, there’s a meaningful improvement here for every gamer dealing with fatigue, dryness, or headaches after long sessions.
Your character walks forward on its own. You aim and the crosshair drifts left. Your camera spins while you’re doing absolutely nothing. Welcome to the most frustrating hardware issue in console gaming: PS5 DualSense controller drift.
Before you spend $70 on a new controller, there’s a real chance you can fix this in under 15 minutes — for free. We’ve compiled every known fix, from the easiest to the most involved, so you can make an informed decision.
⚠️ Affiliate Disclosure: TechPlayGrid is reader-supported. When you buy through links on our site, we may earn an affiliate commission at no extra cost to you.
🔍 What Is Controller Drift — and Why Does It Happen?
Drift occurs when your controller registers joystick input without you touching it. The three main causes:
Cause
Description
Fixable?
Dust/debris under thumbstick
Particles push against the sensor
✅ Yes — compressed air
Worn joystick potentiometer
Sensor loses calibration over time
✅ Sometimes — calibration fix
Dead analog stick module
Physical component failure
⚠️ Requires repair/replacement
Most drift starts as cause #1 or #2, which means most drift is fixable at home.
✅ Fix 1 — Clean Around the Thumbstick (Start Here)
💡 Pro Tip: Do this over a table or white surface so you can see the debris that comes out. Sometimes you’ll be shocked how much dust accumulates under there.
✅ Fix 2 — Recalibrate via PS5 System Settings
Time: 3 minutes | Cost: Free
Your PS5 has a built-in joystick calibration tool that can reset the dead zone and reduce drift caused by sensor miscalibration.
Go to Settings → Accessories → Controllers
Select Adjust Joystick Dead Zone
Follow the on-screen calibration steps
Set Dead Zone slightly higher than default if drift persists
💡 Pro Tip: Increasing the dead zone requires a more deliberate movement before the game registers input. It’s a workaround, not a permanent fix — but it can make many games feel completely drift-free.
✅ Fix 3 — Reset the DualSense Controller
Time: 2 minutes | Cost: Free
A hard reset can clear firmware glitches causing phantom input.
Turn off your PS5 completely
Find the small reset hole on the back of the DualSense (near the L2 trigger)
Insert a pin, toothpick, or SIM tool and hold for 5 seconds
Reconnect the controller via USB cable
Press the PS button
✅ Fix 4 — Update the Controller Firmware
Time: 5 minutes | Cost: Free
Sony has released multiple firmware updates specifically addressing drift on the DualSense.
Connect your DualSense to the PS5 with a USB-C cable
⚠️ Warning: Use 90% or higher. Lower concentrations have too much water and can cause corrosion.
✅ Fix 6 — Use Sony’s Warranty Replacement
Time: Varies | Cost: Free (if under warranty)
Sony’s DualSense controllers come with a 1-year limited warranty. If your controller is drifting within that period, Sony will often repair or replace it at no cost.
Register your controller and describe the drift issue
Ship it in — Sony covers return shipping
💡 Pro Tip: Even if your warranty has expired, it’s worth checking. Sony has faced class action lawsuits over DualSense drift and in some regions has extended coverage.
📊 Fix Summary Table
Fix
Time
Cost
Success Rate
Compressed air cleaning
2 min
Free–$5
⭐⭐⭐⭐⭐
Dead zone recalibration
3 min
Free
⭐⭐⭐⭐
Controller reset
2 min
Free
⭐⭐⭐
Firmware update
5 min
Free
⭐⭐⭐
Isopropyl alcohol
5 min
~$5
⭐⭐⭐⭐
Sony warranty repair
Varies
Free
⭐⭐⭐⭐⭐
🛒 Nothing Worked? Time to Replace
If you’ve tried everything and your DualSense still drifts, it’s likely a dead analog module — which requires either soldering skills or a replacement controller.
💡 Pro Tip: Hall effect controllers are the future. They cost slightly more upfront but can last 3–5x longer without drift. If you’re replacing a drifted controller, seriously consider the upgrade.
Option C — Buy a Spare and Rotate
Many competitive players keep two controllers and rotate them, reducing wear on any single unit.
Is PS5 controller drift covered by warranty? Yes — Sony’s DualSense has a 1-year limited warranty. Contact PlayStation Support or visit repairs.playstation.com.
Can drift come back after cleaning? Yes, if it’s caused by a worn analog module. Cleaning fixes debris-related drift; physical wear requires replacement.
Are third-party controllers as good as the DualSense? For most games, yes. However, haptic feedback and adaptive triggers are DualSense-exclusive features and won’t work on third-party controllers.
How long do DualSense controllers last? Sony rates the DualSense thumbsticks for around 2 million input cycles. Heavy daily gaming can wear them out in 1–2 years.
Last updated: June 2026
⚠️ Affiliate Disclosure: TechPlayGrid participates in the Amazon Associates Program and other affiliate programs. We earn a small commission on qualifying purchases at no extra cost to you.
🏷️ SEO Metadata
Title: PS5 Controller Drifting? Fix It Before You Buy New
Meta Description: PS5 controller drifting on its own? Try these 6 free fixes before spending $70 on a new DualSense. Clean, calibrate, reset — step-by-step guide inside.
Post Summary: Is your PS5 DualSense drifting and sending your character wandering on its own? Before spending money on a replacement, this guide walks you through six proven fixes — from compressed air cleaning and dead zone calibration to isopropyl alcohol treatment and Sony’s warranty program. Only if everything fails do we recommend replacement controllers, including hall effect options that are virtually drift-proof for life.
Meccha Chameleon is one of the most creative hide-and-seek games on Steam: you and your friends spawn as plain white stick figures, and hiders have a prep window to paint themselves and blend into the map before seekers come hunting. Simple concept — but surviving every round takes real craft.
The players who vanish each round aren’t just picking a dark corner. They understand light, shape, texture, and how the seeker’s eye actually works. Here are the 10 best tips to become virtually unfindable.
⚠️ Affiliate Disclosure: TechPlayGrid is reader-supported. When you buy through links on our site, we may earn an affiliate commission at no extra cost to you.
🦎 Tip 1 — Master the Eyedropper Tool First
For illustrative purposes only. Meccha Chamelon Official Website
Before worrying about hiding spots, master your most important tool. Press F to open the paint menu and use the eyedropper to sample the exact color of the surface you plan to hide against.
Rather than eyeballing a color and hoping for the best, point the eyedropper at the exact wall or object you’re hiding against — it copies that color precisely. Lighting shifts color more than you’d expect, so sample the actual surface you’ll press against, not a similar-looking one across the room.
💡 Pro Tip: Grab a base tone, a shadow tone, and a highlight from the real surface — not just one flat color. Real surfaces have variation, and matching that variation is what makes you disappear.
🦎 Tip 2 — Don’t Ignore Metallic and Roughness Sliders
For illustrative purposes only. Meccha Chamelon Official Website
Most beginners color-match reasonably well and still get spotted. The reason is almost always the metallic and roughness settings.
Almost everyone ignores the metallic and roughness sliders — they control how your body catches light. A perfect color on a glossy body still shines wrong against a matte wall, and that’s a common reason a “perfect” hide still gets spotted.
If you’re trying to hide next to a smooth, brightly-colored object like a balloon, dial down the roughness while slightly increasing the metallic to give yourself a light sheen. Or, if you’re blending into featureless, solid-colored wallpaper, turn both sliders all the way down.
🦎 Tip 3 — Budget Your Prep Time Ruthlessly
The prep window feels longer than it is, and the most common way to get caught is wasting it.
Lock your hiding zone in the first third of prep time, sample your colors straight away, and use everything left to refine your edges and settle your pose. Players who hold out for the perfect spot are still half-painted when the hunt begins — and a half-painted body is a free tag.
Plan your hiding spot before you touch the paint tool, not after.
🦎 Tip 4 — Break Your Silhouette
For illustrative purposes only. Meccha Chamelon Official Website
Color-matching alone won’t save you if you still look like a person. Seekers learn to scan for human shapes, not just foreign colors.
Crouch, lie down, flatten against a wall, or pull an awkward emote that bends you into something that isn’t person-shaped. Each map tends to favor a type: low objects everywhere, crouch; a wide open room, lying flat might be what saves you. Stop being a color chameleon and start being a shape chameleon.
🦎 Tip 5 — Never Hide in the Same Spot Twice
For illustrative purposes only. Meccha Chamelon Official Website
The first rule of any good hide-and-seeker is to never hide in the same place twice. No matter how good of a spot you found the first time, if you’re still playing with the same people, they will definitely get wise to you if you try to hide there more than once.
Rotate your spots every round. Even your best hiding place becomes a liability after it’s been found once.
🦎 Tip 6 — Look Up (And Hide Up There)
For illustrative purposes only. Meccha Chamelon Official Website
There’s an old adage in gaming: “gamers don’t look up.” Both in games and in real life, many people just don’t make a habit of looking directly upward — which means you’ve got an entire sub-category of hiding places you can generally rely on.
Rafters, shelves, beams, tops of doorframes — go vertical whenever the map allows it. Seekers will sweep the floor-level spots first and often move on without ever raising their camera.
🦎 Tip 7 — Lock Your Pose and Stay Completely Still
For illustrative purposes only. Meccha Chamelon Official Website
Paint is half the job. The other half is patience.
Once you’ve chosen the pose that fits your disguise, commit to it and stop moving. Micro-movement is the single biggest tell an experienced seeker watches for — one twitch of the camera or an adjusted angle and they’ve got you. Settle, and trust the paint.
Once frozen, stay completely still. Movement breaks even a perfect disguise. Freeze and hold — patience wins rounds.
🦎 Tip 8 — Use the Wedge Trick (Carefully)
For illustrative purposes only. Meccha Chamelon Official Website
Wedging yourself between a wall and a large object is a classic high-percentage hide — but Meccha Chameleon has an anti-exploit system.
When you wedge yourself somewhere or attempt to bury yourself in scenery, the game may give you a warning that you’re too covered for your hiding place to be fair. If you remain in this particular spot for too long, the game will reveal you to seekers automatically.
The trick: if you get a cover warning, adjust your position in small increments until you find a spot that’s still wedged but doesn’t trigger the warning. It takes experimentation, but it works more often than you’d expect.
🦎 Tip 9 — Match the Pattern, Not Just the Shade
For illustrative purposes only. Meccha Chamelon – Steam
Flat-color matches are detectable. What makes truly invisible hiders invisible is pattern replication.
The most effective hiders replicate the full texture of the surface they’re blending into — matching lighting by applying brighter tones on lit sides and darker tones on shadowed sides to give actual depth rather than a flat painted look. Copy full patterns: checkered floors, tile grids, wallpaper designs, and wood grain all need their density and alignment matched to your character’s position.
🦎 Tip 10 — Use Nearby Bad Hiders as Cover
For illustrative purposes only. Meccha Chamelon – Steam
This is the most counterintuitive tip — and one of the most effective.
If a nearby hider has slapped on a loud, sloppy disguise, that’s good news for you — stay exactly where you are. Seekers pounce on the obvious decoy first and often leave the whole area satisfied it’s clear, walking straight past your far better hide on the way out.
Don’t move away from a bad hider nearby. Let them absorb the seeker’s attention while you stay perfectly still and perfectly camouflaged right next to them.
📊 Hiding Tips Priority Table
Tip
Difficulty
Impact
Master the eyedropper
Easy
⭐⭐⭐⭐⭐
Metallic & roughness sliders
Easy
⭐⭐⭐⭐⭐
Budget prep time
Easy
⭐⭐⭐⭐⭐
Break your silhouette
Medium
⭐⭐⭐⭐
Never repeat spots
Easy
⭐⭐⭐⭐
Hide up high
Easy
⭐⭐⭐⭐
Lock pose, stay still
Easy
⭐⭐⭐⭐⭐
Master the wedge
Medium
⭐⭐⭐
Match full pattern
Hard
⭐⭐⭐⭐⭐
Use bad hiders as cover
Easy
⭐⭐⭐
🎮 Bonus: Game Modes Change the Strategy
Your approach should shift with the game mode. Normal mode (Classic Hide and Seek), seekers race a timer, so hiders just need to outlast it. In Increasing Oni (Infection), caught hiders join the hunters, so the seeking side snowballs — survive early and the map gets crowded. In Double (Speed Hunt), everyone hides then everyone seeks, so a fast, clean disguise matters more than a perfect slow one.
Know which mode you’re in before committing to your strategy.
Is Meccha Chameleon available on consoles? No — as of mid-2026, Meccha Chameleon is a Windows-only Steam game ($5.99). Console ports haven’t been announced.
How many players does Meccha Chameleon support? Lobbies run from 2 to 10 players. The game is best with a full group on voice chat.
What’s the best map for beginners? The Mansion and Indoor Country maps are the most forgiving for learning the mechanics, with plenty of surfaces to match and corners to hide in.
Can seekers find hiders who are perfectly still? Yes — experienced seekers use the parallax technique: strafing side-to-side to spot objects that shift against the background. A real wall stays fixed; a hider pressed against it often shifts slightly.
Is there a single-player mode? No — Meccha Chameleon is multiplayer-only and requires an internet connection.
Last updated: June 2026
⚠️ Affiliate Disclosure: TechPlayGrid participates in the Amazon Associates Program and other affiliate programs. We earn a commission on qualifying purchases at no extra cost to you.
🏷️ SEO Metadata
Title: 10 Best Hiding Tips for Meccha Chameleon
Meta Description: Want to stay hidden every round in Meccha Chameleon? These 10 proven hiding tips cover paint tools, poses, spot rotation, and pattern matching to outsmart any seeker.
Tags: meccha chameleon tips, meccha chameleon hiding guide, how to hide meccha chameleon, meccha chameleon steam, hide and seek game tips, meccha chameleon beginner guide
Post Summary: Meccha Chameleon’s hide-and-seek gameplay is deceptively deep — and the players who survive every round know tricks that go far beyond picking a dark corner. This guide breaks down the 10 most impactful hiding tips, from mastering the eyedropper and matching surface textures to breaking your silhouette, never repeating spots, and using nearby sloppy hiders as decoy cover. Whether you’re brand new or getting found too fast, these tips will make you significantly harder to catch.